After completing the first section of my Port of Gierburg gaming table it is time to start with the second module. This one will be a lot more difficult and a lot more exciting. Due to its complexity I will handle the (under)ground level first and then tend to the rest later.Similar to the
first module this one is based on a solid 5mm MDF board. Following my initial plans (see
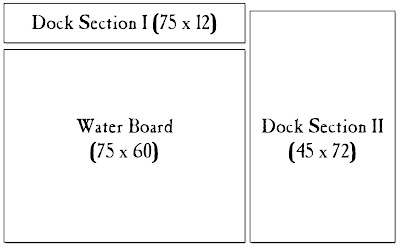
Part 1) it measures 45cm x 72cm.
![]() |
| The concept for the port modules with two dock sections encapsulating a water board |
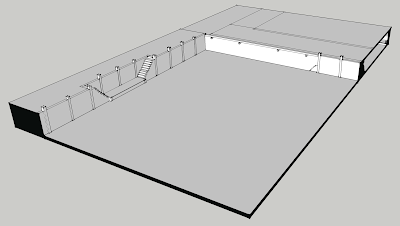
The core of the module is a big 6cm thick piece of styrofoam that was glued on the MDF board using white glue and then cut to shape.
Underneath the City
Something I absolutely wanted to do after seeing an impressive zombie board at
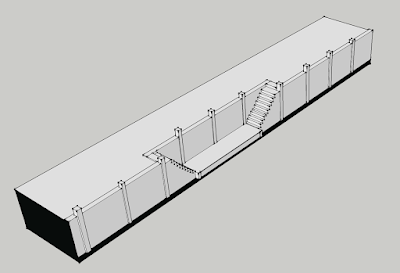
this year's Tactica convention: Tunnels on the sides of the board. The idea is to make the underground accessible from the sides. This adds an additional level to the board which is great from a gaming perspective. It is also a very practical solution compared to undermining the entire board which would then require a lift-off street level.
The first dock section came to have a height of 7,5cm which now determines the height for all sections of the gaming board. Factoring in the neccessary bottom and top this allows for just enough space to include tunnels between 5cm and 6cm high.
The idea is to have the tunnels lead around the two outer edges of the board (
bottom and
right edge if you look at the illustration above). The tunnel along the "bottom" side leads to the harbour wall, where through a small secret crack in the wall it would then be possible for models to enter the docks. At the other end the tunnel would end at the "top" side with a door. Through that door it would be possible to connect future sections with similar tunnels. Somewhere in the middle of the long side I wanted to have the entrance to the tunnels. Again, a door would indicate where models "pop up" on the battlefield. Since the tunnels are only accessible from the sides and the tunnels are not very high, doors are a great way of creating spots where models can go deeper into the board without actually modelling it. How exactly this entrance would work out I will decide when I tackle the first floor of the dock section. For now I have to focus on the (under)ground and just create options for later. I did try to think of an ultimate masterplan for the entire board but I then decided not to try to deal with all the questions at once and instead focus on the beginning at start on that rather than thinking and getting nothing done.
![]() |
| Tunnel tiles for Mordheim |
I chose to apply the same technique that I used a couple of years ago for building
Tunnel tiles for the
Border Town Burning supplement of
Mordheim. I carved/cut/broke the tunnels out of the styrofoam board with a box cutter. Then I coated the surface with filling using a strong brush. I used the brush to get a smoother surface than I got before when merely using my fingers.
![]() |
| The tunnel carved into the styrofoam board |
![]() |
| Applying the filling on the styrofoam |
After the filling had dried completely I added sand to the ground of the tunnel: I first applied a mix of white glue and water to the ground, then sprinkled and rubbed the sand over it. I also placed a few small stones across the tunnels.
I made two simple doors from coffee stirring sticks and glued them in place with white glue.
![]() |
| Two scratch-built doors for the tunnels |
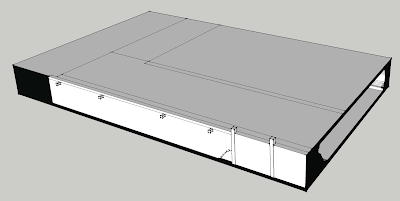
Next, I glued another layer of 3mm MDF board on the styrofoam to get a sturdy ceiling. On top of that I put a 3mm sheet of Selitron. This provides a nice base for the final layer of hard plaster cobblestones from
Vampisol that would come later. However, to get the Selitron height correctly at the edges I had to glue a few 1mm wood pieces on the MDF.
Then I cut four pieces of 1mm thin wooden board to shape so that they would cover the sides of the board, basically creating a kind of veneer.
Before finally doing the cobblestone layer I had to do the walls of the wharf...
The Wharf
The wharf is made from a piece of harbour wall by
GrandManner which I had left from
section I. The remaining wall was filled with flagstone boards from Vampisol. I cut the hard plaster boards to size with a slitting saw.
At the top of the walls I made small indentations with a file. These would later hold small bits of wood that would serve as mounts to place one side of the pier on.
![]() |
| The walls are glued to the sides of the styrofoam |
The last wall piece was filed so that it looks like there is a hole in wall. Through this hole the figures can leave and enter the tunnels during gameplay.
Finally I added capstones, again from Vampisol, so that this section ends up with the same height as the harbour wall piece. With a bit of plaster I filled the gaps around the pier mounts, smoothed out the transitions between the three plaster pieces and modelled the inside of the hole.
Cobblestones
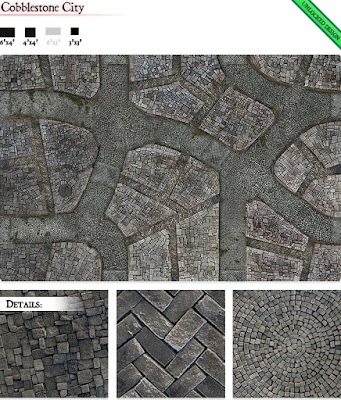
I find this to be the most exciting part of all the work: Building the cobblestone streets. As I mentioned above, I used cobblestone tiles from
Vampisol. The same
stretcher bond pattern that was used on
Dock Section I was applied along one side of this section to continue the street.
For the rest of the board I used the other style of cobblestones, the
segmental arch pattern. I like this pattern a lot for creating places such as town squares and so found it very appropriate for the area around the main docks, which would later be full of cargo, busy lumpers and probably the
dockside crane.
After all cobblestone pieces were glued on the board I used filler for any gaps as well as watered down PVA to glue sand in some of the gaps as well as across the board for variety.
![]() |
| The most important thing was to ensure that both board sections align properl |
The Pier
The Pier is a big wooden structure that extends the wharf. It can be thought of as the counterpart to
the scratch-built jetty of section I.
Mainly, the pier is made from my never-ending bag of coffee stirring sticks that I have used for all works of this type.
The pillars are made from a 8mm thick wooden stick. I needed them to match the looks of the GrandManner harbour walls. Using a large file I rub deep indentations into the wood to achieve similar exaggerated detail. Whether that actually worked out I will only know once they are painted.
Additional details include rope around the pillars made from special rope-style wire, and rivets made from a thin plastic rod.
And this is what it looks like:
![]() |
| The pier set up and awaiting paint |
![]() |
| Dock section I and II placed together |
Lastly: The Heavy TipDuring the building of all these boards I found it extremely useful to keep stacks of heavy books nearby. All materials tend to bend when you least expect it. I have started to leave the books on the styrofoam whenever possible to ensure they always dry in the correct position and even afterwards.
Coming next: Dock Section II Elevation WIP
 Recently my copy of "More Wargame Terrain" arrived in the post. Let's take a look!